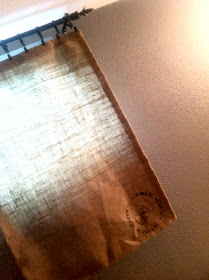
Hi there! First off, I want to apologize that this post did not get posted yesterday. I did try, however, I had some technical difficulties. Let's try this again.... = )
Our basement is a work in progress. When we moved into our home a little over a year ago, we had carpet installed, bought a couch and all the stuff we needed, but the details were definitely overlooked. You see, we know we want the room to be masculine with feminine touches and to have Oregon State football memorabilia. This sounds easy enough but for some reason nothing has seemed to come together just right. Finally, Pinterest caught my attention and my love for burlap grew even stronger (I had no idea that was possible, I love me some burlap). I decided to FINALLY make some curtains for the room and that burlap would help with the masculine feel I was looking for. So...I got to work.
To start, I gathered my supplies. Luckily, I had everything laying around. I needed lots of glue sticks, a glue gun, burlap, scissors and something to measure with.
I cut the burlap a little larger than the size I was wanting each curtain panel to be, this way I could have extra room for gluing. I pulled off all of the frayed edges.
I ironed each panel as flat as I could (I am not the best at ironing, thank goodness for dryers). Next, I folded one side at a time over about an inch and then ironed the fold.
I glued down the ironed edge and then pinned it while it dried.
Once I finished the first panel I laid it on top of the panel I still needed to complete and marked where I needed my folds to be so that they would be the same size.
Once both panels were complete I decided I wanted to add something to them that would fit with the theme of the room (Oregon State). I used my Silhouette to make a stencil and used black paint to create my image. I just dabbed the paint on with a sponge brush. If you are going to try this I would recommend buying fabric paint, I just used what I already had.
This is the image I got when I removed my stencil.
I was so excited to hang them that I forgot to iron them one last time. I hung them with rod clips (cheap from Ikea). I am sorry for the wrinkled mess but I wanted to share them with you. The basement is dark and the light is shining through so the pictures aren't the best quality but hopefully you can get a good idea of how they turned out. I am loving them!
Let me know if you have any questions! = ) I have another project I am excited to share with you tomorrow!


My daughter is going to Oklahoma State right now - OSU (too!) - I love this :)
ReplyDeleteTHANKS!! It is nice to add a touch of our OSU pride without the overkill. = ) Good luck to her at OSU!
ReplyDelete