Showing posts with label Bedroom. Show all posts

Nursery

One December 28th, 2013 my sweet baby girl was born. I have been working on her nursery for a while now but tend to get easily distracted.

I knew I wanted to create a room she could easily grow into but also wanted it to be fun and cheery. Then, one day, while searching online I fund a gorgeous abstract painting that inspired me. Her room is easily one of my favorites in our home.

I am hoping to finish up in the next couple weeks. For now, I will leave you with my mood board. Can't wait to show you the final product!


Hand and Foot Print Wall Art

Posted By:  Stephanie


WARNING:  Throughout this post you will see that she looks miserable.  For the record she made lots of funny faces but never cried. = )

As you may remember we are going to be working on Lou's big girl room and I have slowly been accumulating a few things for the room once it's done.  On this random night I decided it was craft time and we needed to make a little something for her room.

She's ready!

We picked two colors that will match the bedding in her room.
Purple for her hands and pink for her feet.

She liked seeing her hand prints on the canvas.

See, looks like she is crying but I assure you, she was not.
I was having fun with this as you can tell haha!

The finished product.  

We used a very thin canvas that we will either just hang on the wall or frame.  I haven't decided yet.  I'll make sure you see it when it's in the room.  Lou's favorite part of this project was washing her feet in the sink.  My favorite part is having something that she will be able to keep for years and eventually show her kids some day.

Art Work Holders and WINNER!

WE MADE IT!  Thank you all so much for being a support and follower of our blog!  We are having so much fun creating and sharing with all of you!

The winner goes to Reading Romances, CONGRATULATIONS!  I can not find a way to contact you so please contact us by Sunday at 7pm (PDT) or we will draw for another winner.


Posted By:  Stephanie

Crafts, crafts I love crafts!  A couple days ago I got a few minutes during Little Lou's nap time to make these for her big girl room.  I figure if I keep plugging away at things here and there for her big girl room then we will be all set to make it nice and inviting for her when we make the transition.


I got these beauties for $1 each at Goodwill.  I knew just what to do with them!
(Originally saw the idea on Little Miss Momma)


I chose paper that I thought would be a good match for her big girl room and tuned it upside down on the wood and used my crayon to shade the shape of the top of the wood piece onto the paper.


I cut just outside the line, that way I would have room to make adjustments when I held the paper up to the piece of wood.  I found that when I turned the paper over it wasn't exact because the wood is a bit different on all sides so some adjustments were needed.


I then measured two clothes pins so that I knew what size to cut paper to cover these as well.  I did find that each one is slightly different so I measured both of them.


I cut the paper for one clothes pin and laid the paper next to it.  I did the same thing with both pins.


Now for the fun part!  It was time to Mod Podge everything!  I put a layer of Mod Podge on the top of the wood piece to act as glue for my paper.


Once I placed the paper on top I painted a coat on top trying to make it as even as possible.


Follow the same Mod Podge process for all pieces including the clothes pins.  Here they are drying so you can still see the white.  At this point I couldn't wait to see the final product!  Once the Mod Podge was dry I glued the clothes pins to the boards.


Here you have it, two boards waiting for my sweet girl's perfect art work to hold!


Although I appreciate personality I prefer to not have these knots be the focal point of these art holders.  For that reason they are on the bottom so that when they are hung you will not see the knots when looking from above.  I considered staining these and I did a tester on the back and didn't really like the look.  I also thought about painting the outside white but I didn't want to deal with painting the clothes pins so I kept them both natural so they would match.


How do you display your little one's art work?  Do they have art work on the wall in their room?


Bedroom Makeover

Posted By: Kristi

Why is it that our bedroom is always the last room that we decorate and beautify? This is the room that we get romantic in, but for many of us, when we look around our bedroom we notice that there isn't much romantic about it. I have decided it is time for a bedroom makeover. We moved into our house over a year ago and have barely done a thing to it. It will take time to complete but at least I have my inspiration pictures (sorry, I don't have the sources for the pictures).

The color scheme will be mainly black and white with a touch of yellow.

All white bedding.

Black and white striped curtains or I will make black and white striped roman shades.

I will make a burlap headboard.

Paint our dresser yellow.

Add striped throw pillows on the bed.

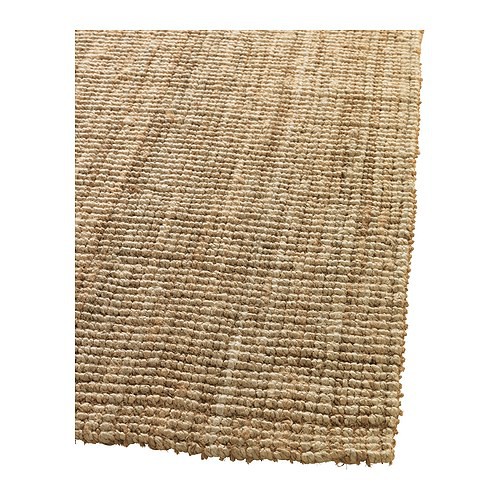
Jute area rug to add texture and to tie in the headboard.

Carson just gave me his nod of approval, thank goodness he lets me run with my ideas!

What do you think??


Crayon Print T-Shirt

Posted By:  Stephanie

Hello!  Today is a great day, the first day of a 3 day weekend for Will.  I love when he gets an additional day off, that way once Sunday night comes we are gitty that we get to hang out late one more night.  Sadly, late for us is like 10:30-11:00pm, that is what used to be 1-2am when we were younger.

Today I went to the Dollar Store, with a craft emergency!  I am working on another project but the paint is taking WAY to long to dry so I wanted/needed to make another project.  It was also a good excuse to get out of the house and sneak to an estate sale on the way.

Here we go, a tutorial on how to make a T-Shirt print using CRAYONS!  This is such an easy project and it only cost $2.  I got the T-Shirt and the sandpaper from the Dollar Store and I already had the crayons on hand.

Step One

Gather supplies.  I used stencils because I'm in no way a freehand kind of girl.  I love to craft but my drawing is not to be seen.

Supplies:

Crayons
T-Shirt
Sandpaper - preferably fine
Stencils if you would like
Iron
Dryer


Step Two

Start drawing your picture on sandpaper.  I decided to use a dog and cat because My Girl LOVES dogs and cats right now.  When you are coloring, make sure to go over your design several times, you want the crayon to be on there nice and thick.  This is something that your kids would love to do, just remind them that whatever they draw, it will be on the T-Shirt backwards.


Step Three

Once you are finished you may see that there are a few spots that have crayon marks that you don't want to show up on your T-Shirt.  I used a piece of the sandpaper from the corner and sanded those spots.  Seemed to work pretty well for me.


Step Four

Put cardboard inside the T-Shirt to prevent the crayon from leaking through.


Step Five

Iron the design onto the T-Shirt.  Put something like a thin towel or paper towel between the sandpaper and the iron to protect your iron.  Iron on cotton setting for about 30-45 seconds.


Step Six

Check to make sure your design is transferring onto the T-Shirt well, if not continue ironing for another 15-20 seconds.  If it is on there well, take the sandpaper off and put a paper towel or thin towel on the image and iron on top of it for about 20 seconds to set it.


Step Seven

Put the T-Shirt in the dryer for about 20-30 minutes to finish setting it.  When you wash it for the first time make sure you wash it all alone because the crayon may bleed some.


My Girl in her new fancy doggy and kitty shirt.  She is such a goof!


I will be using this shirt most likely for when we do crafts, that way I wont have to worry about her clothes getting stained.  We did another project today where she was using some permanent makers...I know probably not my best parental choice, but hey, the project needed permanent markers what was I supposed to do?  = )  Anyway, this T-Shirt will be used for things like that, her clothes were spared this time but the tray of her highchair was not.

This would be a great project for older kids at a birthday party.  Please make sure you either assist them or do the ironing yourself, burnt fingers are not cool!  All the kids could make their design, iron them and then while you continue the party you can dry to set them.  I don't know how multiple shirts would do in the dryer at the same time but you could also send the T-Shirt home and let the parents know that they will need to dry it there. 


WHAT WE'RE UP TO AROUND HERE

WARNING:  Images below may hurt your eyes!

These are pictures of what will be our girl's big girl room.  When we moved in we put a ton of stuff that we didn't want to deal with at the time into this room, and we have continued to throw things in it since.  I will even confess, this room was even worse, this is after Will had been working on clearing it out for awhile.


I'm not sure why these pictures turned out so bad, I think it's because of the bad lighting.  Here is trooper Will, he takes a long time to clear out each box because a lot of them have pictures from his childhood.


I'll be back with more on that room, you will get to watch the room transform, I have a lot of projects in mind for it.  For now, I need to get ready to go, I'm going with Bubba to a wedding.  SISTER DATE!


Bedroom Wall Art

Posted By: Kristi


Choosing wall art can be tough, especially for the bedroom. We originally had prints up in our bedroom of trees but it didn't feel personal or cozy. Someone else probably had the same prints hanging in their bedroom and that was not the direction I was going for. I wanted our room to be "us", fun and personal. A really inexpensive way to add wall art to your room is to print photos that are special to the both of you and frame them.

Carson proposed to me in Washington D.C. at the National Cathedral. It was a gorgeous day and the perfect moment. We had taken a couple pictures that day and I knew that they would be perfect for our bedroom walls. I went online and had them printed. These are the pictures I chose; the second picture is where Carson proposed.


I bought two frames from Ikea.


and framed my pictures.


Even though the quality of this picture is not good (sorry, had to use my cell camera) they look great! I love how they turned out and it is nice to get to see them everyday instead of having them hidden away in an album.

Since I am sharing these photos I will also share our proposal story, just for fun. = )

We had been in Washington D.C. for a few days and we were on our last day before heading to New York. We spent the first half of the day in Alexandria and then headed to the Washington National Cathedral. I had been to D.C. before and remembered the Cathedral being breathtaking, one of my favorite spots. Carson knew that and had agreed that we make a trip to see it. We spent about an hour inside before decided to tour the outside. We walked around and took lots of pictures. I thought we had seen everything so I started to walk off. Carson quickly stopped me and said we should see if we could find any paths. So we walked around some more until we found a really pretty secluded area. There was a little bench that we sat down on and talked for a while. I must have looked away because next thing I know, I turn my head to say something to him and he is on one knee.

SIDE NOTE:  Before I go on I have to mention that everyone kept asking me if he was going to propose on our trip. I kept telling everyone NO WAY. I thought I would know or at least have a feeling. Carson also had people ask him the same question so during the trip we would joke about it. 

So now, here we are, and Carson is on his knee. I look at him and laugh and ask if he is joking. He says no but I don't believe him. Next thing I know he is saying a bunch of sweet things and he has a ring in his hand. I was in SHOCK! Best feeling EVER!


Do you have pictures of your proposal location?

Related Posts Plugin for WordPress, Blogger...