Showing posts with label Clean. Show all posts

Favorite Non-Toxic Cleaners and Quick Cleaning Tips

Posted By:  Stephanie

I've always liked the thought of cleaning with non-toxic cleaners but didn't act on it until I was pregnant with Little Lou.  At that time I decided it was time to find some great non-toxic cleaners so that I was able to keep our family safe from harmful toxins that are found in many cleaners out there while still getting our house fresh and clean.  I was not paid or perked to write about these cleaning products, I just wanted to share my findings with you.


I love the Mr Clean Magic Erasers for the tough stuff that just wont scrub off with anything else.  Seriously, these are magic.  Kristi posted how she was able to get 30 "Magic Erasers" for $8.49 on Amazon.  Now that is a great deal!


Of course I still have my love for vinegar which I posted about here.  I go through this stuff like it's going out of style.  I haven't been one to contribute to the shortage of bacon, but if there was a shortage going on with vinegar I would be guilty.  = )


Next up are my favorite cleaners that I use on everything from bathrooms, including toilets to mirrors, counters, kitchen sink, microwave (although there is a super awesome tip that Kristi posted on and easy way to clean your microwave I still like to use some cleaner in it when I'm finished) and even Lou's highchair.  I use the product Biokleen which is non-toxic, cleans great and smells good too!  This All Purpose Cleaner has been great on my glass, I just use a microfiber towel (sorry don't have a picture of those but I get a huge pack of them from Costco and they last forever) and this cleaner and I don't end up with any streaks.  Love it! 


For the toilets and the area around them (walls and floor) I use Bac-Out which is a stain and odor remover.  Even if I don't smell anything I'm sure there's some nasty stuff there that needs a little extra powerful stuff to clean it.  


Next up is what I use on my floors.  This stuff is awesome, it cleans the floor well and leaves it seriously sparkling clean.  I was actually on my hands and knees scrubbing the floor last week with this stuff and that's what made me think I should really share with all of you how great it is and what other cleaning products I love.  This particular cleaner is for stone, tile and laminate floors by Bona.
We only have a couple area rugs in our house, the rest are all either laminate, pergo or hardwood.  This is the hardwood cleaner I use and to be honest, I should really clean my hardwoods more often with this stuff.  How often do you clean your hardwood floors?


Now a few tips on how to keep your house looking somewhat decent and ready for random people showing up at your door, that is without doing the 30-60 second clean up that leaves you sweating like you just ran a marathon when you greet your guests.

1.  Never leave a room empty handed.  If you are leaving a room grab at least one thing that needs to be put away.

2.  If you have kids have them clean up toys as they are finished with them and move onto something else.  If nothing else clean up toys with help of your little one (all of them even though they are just going to come out again) before nap and before bed.  That way you will have two times a day that everything is picked up and you don't have to wake up to a mess.

3.  Always rinse your dish and put it in the dishwasher as you use them to prevent a sink pile up.

4.  In between cleaning the bathrooms water and toothpaste splatters on the counter/sink.  Keep baby wipes (again they are non-toxic and you aren't disinfecting just cleaning up) under the sink to quickly wipe down the counter and sink to keep a nice looking appearance.

5.  Clean up dishes in the kitchen as you cook.  For example, while one thing is cooking wash the pot/pan that you are finished with.

6.  When you wipe down your kitchen counters open the microwave and always wipe it out too even if it doesn't look dirty.  This will prevent you from having to use the tip linked to above.  It doesn't take but an extra couple seconds but it keeps you from more work later.  Seriously, who wants a guest to come over and you end up heating something for them in a nasty microwave while trying to hide it from them, no thank you.

5.  Fold laundry as it comes out of the dryer to prevent piles of laundry.  I have to admit that this is something that I normally do, however since we've had Lelo 6 weeks ago I've kept up on folding towels and burp cloths but the clean clothes are in a heaping pile because I've only actually folded laundry twice since then.  Oh well, I'll get back into the groove.  At  least we have clean laundry right?  * The correct answer to that would be yes, you don't want to make me feel bad, do you? = ) *


What are your favorite non-toxic cleaners?  I would love to know if there's something that works great that I should try!


How to Make Liquid Hand Soap

Posted By:  Stephanie

Good morning!  Today I'm going to show you a quick tutorial on how to make liquid hand soap.  Seriously, it is so easy and such a money saver that we should all do this.


Gather all your supplies:

1 gallon distilled water
1 8oz bar of soap
*after trial and error on my husband's part making body wash we found Dove does not work well*
Glycerin
 *usually found near the band aids*
1 TBSP measuring spoon
Cheese grater


Step 1:  Grate the bar of soap and add the soap and 2 TBSP Glycerin to a pot of 1 gallon distilled water.

We (my husband and I) used a 5.5oz bar of soap and found that if we used a bit less water or an 8oz bar of soap it would have worked a little better.  We were still happy with the results so the soap wont go to waste.


Step 2:  Turn the heat to medium/high heat and continue to heat until the soap shavings dissolve.


As it is dissolving stir it up, this process doesn't take long.


This is what it will look like once you're finished dissolving the soap.


Step 3:  Wait about 24 hours for the soap to settle and become less runny.  Get out your handy mixer and mix it...mix it real good. (said in the tune of Push It by Salt and Peppa)


Step 4:  Use a funnel and pour your soap into the gallon container the water came in for storage.


That's it, you're done!

Of course everything turns out better when you have a messy cute assistant helping out.


Now get to it!  

Seriously this is SO easy and will save you tons of money over time.  Like I said though, don't use Dove bar soap for this, it was a runny mess!  I personally prefer the natural soaps for 2 reasons:

1.  The cost savings is even greater
2.  When we did try the dove the smell wasn't pleasant it was all chemical, no thank you.


DIY HE Laundry Detergent

Posted By: Kristi


I have been wanting to make my own laundry detergent for a LONG time now and FINALLY, I did it! I am super excited about how well it cleans too.

We have an high-efficient (top loading) washing machine so we needed detergent that would be compatible. I have been researching recipes for a while and finally found one I like and works well. We will be saving a ton of money too, major plus!

The ingredients needed are:

Borax
Washing Soda
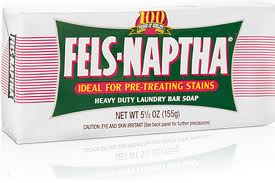
Fels-Naptha

Not bad, right?


Grate the bar of Fels-Naptha with the small side of the grater. Or, if you have a food processor you can use that as well.


Once your Fels-Naptha is grated, add in 1 cup of Borax and 1 cup of Washing Soda. 

I tripled the recipe for a larger batch.
Once all the ingredients were in the jar, I put the lid on and shook it. I wanted to make sure it was mixed up well. Then I opened the lid and mixed it even more. If you want, you can add your favorite scented oil but I left mine as is. This detergent is even safe for baby clothes, no reason to go buy a separate special detergent when this one does it all.


That's it, I was done! I gave it the test run and it worked great! If you have been staling like me, you should go for it. Really, you wont regret it.


Simple but Brilliant Cleaning Tips

Posted By: Kristi

Real Simple magazine has shared some really awesome cleaning tips that I had never heard of before; so amazing that I had to quickly sign onto our blog to share with you! I have been getting Real Simple mailed to me for about a year now and it is one of my favorites. Some issues aren't as informative as others but I got such a great deal on my subscription so it is no big deal! Plus, some issues are super fab!


Cooking Spray as Candlestick Cleaner
Celebrating by candlelight? Spray the inside of a votive holder with a thin coating before dropping in a tea light. After the candle has burned down, the remaining wax will slip out.

Dryer sheets with an iron
Dryer Sheet as Iron Cleaner
Remove gunk from the soleplate of an iron. With the setting on low, rub the iron over the dryer sheet until the residue disappears, and you're left with a pristine press.

0604red-shoe
Emery Board as Stain Remover
Remove small stains from suede by gently rubbing the file (either side) across the problem area a few times to get rid of the splotch and refresh the nap.

Cornmeal used to absorb grease stains
Cornmeal as Grease Absorber
Add this to the grocery shopping list for new reasons. Cornmeal absorbs grease on light colored fabric or upholstery. Pour enough on to cover the soiled area and let sit for 15 to 30 minutes. Vacuum to remove the grains.

Hair dryer used to remove price stickers
Hair Dryer as Sticker Remover
A little hot air quickly loosens price labels—with zero fingernail-chipping frustration.

Vinegar used to deodorize garbage disposal
Vinegar as Garbage Disposal Deodorizer
Deodorize a garbage disposal. Make vinegar ice cubes and feed them down the disposal. After grinding, run cold water through the drain.

Zippered plastic bag used to remove wax
Zippered Plastic Bag as Wax Remover
To freeze wax so you can remove it from a tablecloth, fill a plastic bag with ice cubes and cover the wax with it for about 20 minutes.

Woman cleaning a cutting board with lemon
Lemon as Cutting Board Cleaner
To remove tough food stains from light wood and plastic cutting boards, slice a lemon in half, squeeze onto the soiled surface, rub, and let sit for 20 minutes before rinsing. The best part? You'll have a house that smells like a lemon grove rather than chemicals.

Lemonade Kool-Aid and a dishwasher
Lemonade Kool-Aid as Dishwasher Cleaner
Clean lime deposits and iron stains inside the dishwasher by pouring a packet of lemonade Kool-Aid (the only flavor that works) into the detergent cup and running the (empty) dishwasher. The citric acid in the mix wipes out stains; you don't have to.

Shaving cream and nail polish
Nail Polish as Rust Preventer
Coat the bottom of a shaving-cream can to fend off rust rings on the ledge of the tub.

An egg and a canister of salt
Salt as Egg Cleanup
Sop up a spilled egg by sprinkling salt over the mess. Wait two minutes and wipe it up.

Sketch pencil
 WD-40 as Crayon Cleanup
To remove crayon marks apply just a small amount to almost any surface (plastic, metal, TV screens, freshly painted walls) and rub away with a clean cloth.

White Bread as Painting Cleaner
 White Bread as Painting Cleaner
To clean an oil painting, softly rub a piece of white bread over it to remove dust or dirt.


 Great tips, right? We will continue to share more as we come across them!


Amazing Deal!

Posted By: Kristi

I remember years ago when I tried cleaning with the Mr. Clean Magic Eraser for the first time. It was the easiest cleaning I had ever done. In less than five minutes my entire bathtub was sparkly clean. I only wished that I had heard of this Magic Eraser sooner. I have been using this product ever since, paying around $7.00 for a box of two.


Fast forward to this last week. Pinterest taught me something amazing, again. The Magic Eraser is made of melamine foam which is used to insulate pipes, duct work and is a soundproofing material. Who knew? I also learned that melamine foam cleaner sponges (who cares about the Mr. Clean brand name, right?) can be purchased on Ebay. THESE are the ones that were recommended by a few different bloggers found via Pinterest. That's right, a pack of 30 for only $8.49! WOOHOO!


They came in TWO days! Way faster than expected. They work just as good, I am a happy girl! These are definitely something I will be hoarding. = )

If you have a favorite cleaning tool please tell me about it. I love myself a good cleaner!

Portland's Largest Garage Sale and Cleaning Your Microwave

Posted By: Kristi

This weekend was relaxing and pretty uneventful for the most part. This is not something that happens very often so I took advantage of every single moment and was as lazy as possible. It felt good, real good!

There was a few hours on Saturday where I did manage to get out of the house. My Dad and I met up with Stephanie and a few others at Portland's Metropolitan Exposition Center for Portland's Largest Garage Sale. That is how it is advertised anyway.


It was a pretty large event and there were a ton of people there to check it out. In my opinion there was more junk than treasure but I did find a few things to bring home with me.

I bought an old galvanized tub that I am thinking about making into something like this.


I will use it as an ottoman or a dog bed (even thought I am sure those kids of mine will never sleep on it). I am also thinking about making an outdoor table out of it. I will share whatever I do end up using it for.

I also bought some brand new stuff to put in stockings but I can't tell you about those deals yet since some of the people who will be getting those gifts read this. Again, I will share later.

They were passing these out for free. I don't really need one but they are pretty cool for those who do.


I also cleaned our microwave. Usually this is a painful process but I found a helpful tip that made it much easier and it took about six minutes total. We had chili explode in our microwave recently so I was dreading cleaning it. Most of the time the mess is behind closed door (until it is time to heat something up) so it is easy to put off cleaning the microwave. But how embarrassing it is when you have guests over and they see what you've been hiding. Not cool.

This is embarrassing but I am being honest so here we go...our microwave, prior to cleaning.


Ummmm, YUCK!

For a quick fix place a microwave safe bowl filled with water in the microwave for five minutes.


The steam from the water will make it easy to remove all the nastiness from your microwave walls. Once five minutes has gone by, remove the bowl from the microwave. With a warm damp cloth wipe your microwave walls clean. This will go super fast, everything will come off easily. Remove the glass tray and clean it as well. That's it, it is that simple.


Now that I know this trick I am embarrassed that I let the mess sit there for even a day. Next time I will clean up right away.

It seems like all the projects I am currently working on are pretty big. Mostly furniture makeovers. Please bare with me, I am getting closer to having more time to work on projects and then will have a lot more to share with you.

Have a great week!


Related Posts Plugin for WordPress, Blogger...