Pine Cone Door Hang Decoration

Posted By:  Stephanie

Two Thursdays ago Lou and I went over to visit and have a craft day with my friend Breanna from Dollar Store Mom.  Our day was cut a little short when Little Lou was very tired and made it clear that I needed to focus on her need for a nap, not my crafts.  Before we left I did manage to get small a craft underway.

I had seen a similar idea in a magazine with pine cones hanging from the back of chairs in a dining room.  I really liked the idea but I knew that anything hanging from the back of chairs in our house wouldn't last but two minutes - if I was lucky.


I gathered 5 pine cones that I had from previous years.  They are the ones that you can get in the stores that have the yummy smell on them.  These don't smell anymore but I still had them, knowing I would find a project for them some day.


Using my glue gun I put some glue on white ribbon I found for $1 in the craft section at Wal-Mart.  I'm lucky to have one of the only clean nice Wal-Marts that exist.


Then I pressed the ribbon onto the pine cone and set it out to completely dry doing this will all 5 pine cones.  This is were I left off and had to go home for nap time.


Once I was able to pick back up on the little project I held up the pine cones on the ribbons and adjusted them how I wanted them to hang.  I glued each layer of ribbon to keep them in place.


With the same ribbon I made a bow and glued it on top where it would cover the glue that was soaking through from where I glued all the pieces together.  I trimmed the longer pieces on top so that you can't see above the bow.


Last step was to make a loop to hang the pine cone door hang from.  I made a loop and glued it on the back. As you can see the back isn't all that attractive, that's why it's the back, right?


I love how it turned out.  I really like the white and that it is a subtle decoration, we have a lot of the traditional red and green inside, the white is kind of nice.


What do you hang on your door?


CD's Made Candle Holder

Posted By: Kristi

Hello! I hope you all had a very nice weekend and a fabulous Thanksgiving! Thanksgiving with our family was very nice, as always. We stayed up with all the other crazy people out there and shopped on Black Friday. It is a tradition that Steph and I have been doing since I can remember. I have to admit, I didn't like that some of the stores opened at midnight. I prefer the excitement of waking up early and beating the crowds! It was still fun, just not the same.

Last week we had some not so good stuff happen to our home. It was raining so hard that some of the rain found its way through our basement window seals and drenched the carpets. They were SOAKED! We called Stanley Steamer and they quickly came to our rescue. They had to remove the rug pad and extract all of the water. They put holes in the bottom of the wall to make sure that all of the water was gone. It has been a mess around here to say the least. Insurance doesn't cover this kind of damage so as of now we have spent $1,800! BOO! We still have to buy a new carpet pad and get the carpet put back down. The biggest bummer is that the carpet is only a year old. Oh-well, it will all be ok. = )


Here is a fun and easy project for you to try, it only takes 10 minutes!

You will need a mug and two CD's


Preheat your oven to 375. Place the CD's on top of each other (shiny sides out) and place them on top of an oven safe mug.


Carefully place the mug with the CD's on top in the oven for 10 minutes.


Once 10 minutes has passed, remove the mug from the oven and let it cool.


Once cooled add a candle.


I LOVE that it has a mercury glass feel to it!

Note: I think it could be especially cool if you used a mug with a smaller circumference and then left it in the oven just a little longer. If you try this, please send us a picture. = )

Have a great week everyone!


Amazing Deal!

Posted By: Kristi

I remember years ago when I tried cleaning with the Mr. Clean Magic Eraser for the first time. It was the easiest cleaning I had ever done. In less than five minutes my entire bathtub was sparkly clean. I only wished that I had heard of this Magic Eraser sooner. I have been using this product ever since, paying around $7.00 for a box of two.


Fast forward to this last week. Pinterest taught me something amazing, again. The Magic Eraser is made of melamine foam which is used to insulate pipes, duct work and is a soundproofing material. Who knew? I also learned that melamine foam cleaner sponges (who cares about the Mr. Clean brand name, right?) can be purchased on Ebay. THESE are the ones that were recommended by a few different bloggers found via Pinterest. That's right, a pack of 30 for only $8.49! WOOHOO!


They came in TWO days! Way faster than expected. They work just as good, I am a happy girl! These are definitely something I will be hoarding. = )

If you have a favorite cleaning tool please tell me about it. I love myself a good cleaner!

Toddler Tuesday - Build a Fort

Posted By:  Stephanie

Good morning!  I normally would have already posted by now but I couldn't sign on last night and then today we have been loosing our electricity on and off all morning which has made it very hard to get on the Internet.  Oh well, HERE I AM!

Today is Toddler Tuesday and I have an activity that is fun for both kids and adults, or at least Will and I think it is fun.  Some of you have mentioned that you live in nice sunny states where you don't have rain often (not the case here) but when you do get rain you aren't sure what activities to do with your kids.  Here is a great idea for you...make a fort!

I was selling my fabric gift bags at a bazaar this last weekend and when I came home I found that Will and Little Lou had made this fort.  I know, you can hardly see it with the camo blanket on top. ; )


They made this one with a bunch of chairs and then they put pillows inside so they could get comfy and read books in the fort.  As you can see it was hard to take pictures of Lou, she was all over the place LOVING IT!


Will wanted me to make sure I mentioned that if you make a fort under a table you should put chairs together in front of it to make a hallway kind of thing with a blanket over it as an entry to the fort.  He says that is was his favorite when he was little because he would pretend he was in an igloo.  I just love that guy.

Kristi and I used to make forts too, there's just something fun about getting into your own little space you built.

Did you make forts when you were little?  What was your favorite kind?  Under a table, chairs, something else?  Please share your ideas and the memories you have from when you were little, or what you've done with your kids.

PS Yes, we have already decorated for Christmas, I'll be sharing about that another day.

Fiddle Leaf Fig Tree

Posted By: Kristi

I am realizing that many of my posts are about things I want. As a reader it has to seem a bit selfish when we are at the time of the year where we celebrate giving. Please understand that I LOVE to give; there isn't much that makes me happier. I enjoy making others feel special and seeing their faces light up when you give them something they have been wanting. Spoiling others is so much more fun than buying things for myself. Unfortunately I can't tell you about the things that I have been buying for those I love because it would ruin the surprise. I wanted to make sure to clear that up, I was feeling like I was sounding a little selfish.

What it comes down to is that I love to decorate, have a lot of decorating that needs to be done and I crave a good deal. I have enjoyed sharing the progress of our house projects and am thankful for all of your helpful comments and decorating advice, thank you.

Now, time to share another thing that has caught my eye. I was browsing Pinterest and saw this picture, captioned: fiddle leaf fig tree.


Oh my goodness, this tree is amazing! I love the huge leaves and the beautiful green color. I have a basket much like the one this tree is in and would love to fill it with one of these. I had to continue searching for more images.


Aren't they gorgeous? I love bringing the outdoors in but sadly I am much like my mom and can't seem to keep a plant alive. Not even a cactus. Lame I know. I try, I really do. Thankfully Carson was blessed with a green thumb and can make anything grow.

Yes, I want one. Will I get one? We'll see. I am spoiled but I don't get everything I want. = )

What is something that you would love to buy for yourself but feel a little guilty about it and haven't pulled the trigger?


Dressing up a bulletin board

Posted By: Kristi

Hello, 4Eighteen followers! TGIF, right?! = )

Tomorrow we have plans to go to the Oregon State football game and then Sunday it is back to studying. Hopefully you all have TWO days worth of fun and excitement coming up.

This week I have been working on a variety of projects. This is good in some ways, I am getting a lot done but for once it would probably work out better if I finished one room and then moved to the next. I create such a mess for myself (and for my poor boy toy). I already told you that I am working on my living room but I took a break from that while I wait for some more stuff to be delivered and dressed up a bulletin board I had purchased. We have an electrical box on the wall in our laundry room that I have been wanting to hide and finally decided a bulletin board would be the perfect solution. That way we can still get to the box but at the same time I have somewhere to hang all of the awesome laundry secrets I find in magazines and while reading your blogs. So I went to work.


Much better! Once I fold the clean clothes in my laundry room (I have actually been keeping up on my folding..go me!) I will post pictures of my laundry room. = )

Have a great Friday and enjoy your weekend!


How to Make a Tutu - Tutorial

Posted By:  Stephanie

See this super cute girl?  She belongs to my friend Breanna at Dollar Store Mom.  If you haven't been to her site yet you're missing out.  She has all kinds of tips and tricks on how to be the best mom, on a budget.


When we were invited to her birthday party at the end of September I knew I wanted to find something girly for her, something she could dress up in.  When we went through the girly isles of the store I found this skirt which was $20.  Being that we are on a budget and I also didn't feel that the skirt was as cute as it could be for that money I ventured onto the craft isle to get supplies to make my own.  A friend of ours had gifted a tutu to Little Lou at my baby shower so I went off that one for direction on how to make a tutu for the birthday girl.


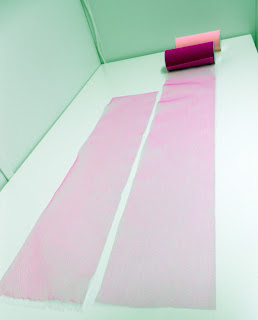
I picked out two colors of tulle that I thought would look good together and ribbon to match the lighter color. You can make a tutu with one color or multiple, it's up to you.


I cut two pieces at the same time on top of each other to the size I wanted and then used those as a guide for the rest.  When determining the length you are cutting remember that the length is going to be half of what you cut, it stretches some and think about how tall the person is you're making it for.  When making this one I cut 24 inch pieces knowing that it would be a bit long, I wanted it to fit her longer than a couple months.


To make this process a bit easier I pinned the ribbon on the shelf brackets.  Most people don't have their craft room in a closet but you can find something else to pin it to if you feel the need.  Personally I feel this made the process so much easier.


See below for instructions on how to put the tulle on the ribbon.  I have learned after making this one that you can also use elastic instead of ribbon if you choose.


Once complete you have a cute tutu for an even cuter child.


With Christmas coming up this would be a great gift for the little girls you have planned to purchase gifts for.


Rug Shopping

Posted By: Kristi

I never realized how difficult rug shopping could be. There are so many different sizes, colors, carpet types and lengths.  My living room was feeling cold and uninviting and also looking really dark and...brown.


See what I mean? Brown floors, brown furniture, brown pillows. There is no ceiling light which makes the room even darker. This room has a ton of potential and eventually we will get there. I love the floors but I wanted it to feel cozier, warmer. I wanted a rug that could work with whatever furniture we choose in the future and that was large in size. I wanted something that wouldn't easily ruin by our dog babies nails. That said, I started searching.

I found many great options but wasn't completely satisfied until I found this one on the West Elm site.


It is an indoor/outdoor rug which is perfect with our dogs, nearly indestructible. I ordered it in an 8x10 the perfect size for our living room. HUGE. It is/was on sale for $179.99 regularly $599.99. That is a $420.00 savings and I found a code to get free shipping. SCORE!

I also ordered a rug pad from Amazon. This is the one I ordered; I wanted to be sure to protect our wood floors. I paid $54.99 (regularly $89.99) and I am happy with it.

Here it is in our home.


And here it is with the coffee table I showed you the other day.


Here is what are in the plans next.
  • New pillows on the couches (adding more color in the room including black and grey)
  • Add some kind of throw on the couch
  • New curtains
  • Buy and restore an old end table and replace the one we have, preferably pedestal style
  • New lamp
  • New wall art
  • Decorate the coffee table
Another reason I went with a plain colored rug (besides possibly changing the furniture out) is because the living room is connected to the dining room and I bought another rug (with a design) for under the table in there. It hasn't arrived yet but when it does I will share it and give you all the details.

I also came across some amazing deals on Overstock, I definitely recommend checking out what they have.


*Update- The rug I ordered has sold out. Sorry!

Related Posts Plugin for WordPress, Blogger...